Do you want off those obnoxious list for Porn sites? Well, it's tough. There's not really a good answer to that one. I don't think anyone has a sure fire way to keep them from sending that junk to you once they get your address. Here's the long and short of it.
These are some things you can do to minimize it.
1. Never, ever, reply or respond in any way - just delete the e-mail. When you ask to be removed, all it does is tell them they have a "real" e-mail address. After all, anyone who would send out junk like that probably doesn't really care if you're angry about being on the list. So, don't respond to junk mail. Just delete it.
Besides, most of them use a fake e-mail address, so you can't reply to it anyhow.
2. Be careful what you sign up for and tell your friends not to sign you up for stuff.
You don't want to accidentally sign up or get on a list that freely sells its subscribers to anyone who will buy (no, we don't - in case you're wondering) and they didn't inform you of this.
Unfortunately it works the same way online as it does in the real world of direct marketing. You purchase something and give your phone number away. The place you make your purchase from then sells your information and suddenly you start getting telemarketers calling constantly (especially at dinner).
So, maybe you signed up for or purchased something on the web and the company sold your e-mail address. Now your address is on a CD with millions of others that's being sold for $150.00 to whoever wants to buy it. (And no, we don't do that either)
My advice on this one is to make sure whoever you're giving your info to will respect your privacy and not sell your information to a third party. If you're one of the thousands of people who have purchased software from us in the past, you probably noticed that we have privacy policy that promises we won't give your info away. Make sure any site you give you info to has a similar policy.
3. Another way to get your e-mail address on these lists is to post stuff somewhere. You post a classified ad or stick a link on a free for all links page and your address is sitting out there for the taking. There are little programs that "harvest" e-mail address from all over the net, so any time you post something, you risk getting added to a list somewhere.
Chat rooms, especially on AOL, are good targets for these e-mail harvesters too.
Sometimes it's a good idea to maintain a free e-mail address for this kind of thing, so you can avoid getting lots of spam in your regular e-mail account. Check out Yahoo or Hotmail for these.
4. And finally - tell people to use BCC (Blind Carbon Copy) to forward you e-mail. Have you ever gotten something forwarded to you with hundreds of e-mail addresses in the header? If so, your e-mail address may be getting unintentionally passed all over the net. Tell people to BCC forwarded messages to you so your address isn't exposed to the world.
Saturday, September 1, 2007
Reclaim and Rename Your Internet Explorer
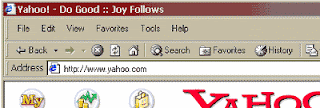
If you’ve ever used AOL or bought a computer from Compaq, you’ve already seen how the title bar in Internet Explorer can be changed. We ran an article a while back about how to remove such corporate customization, but did you know that YOU can actually change the default title yourself to whatever you want it to be?
Yes, it’s true! See, I changed mine to my favorite slogan – “Do good, joy follows.”
Changing the title is a simple process that only requires you to change one ‘key’ in your registry.
The standard disclaimers apply: don’t ever add random keys to your registry or delete keys unless you really, really know what you’re doing.
Let’s get to it!
Run the Registry Editor by opening the Start menu and selecting Run. Type “regedit” and click OK.
Hit F3 to bring up the search menu and type “window title.” That should take you to the following key:
KEY_CURRENT_USER\Software\Microsoft\Internet Explorer\Main
If the search doesn’t find anything, navigate to the above key by clicking in the left-hand side of the Registry Editor.
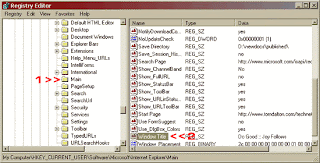
If the key exists, simply double click on the words Window Title. In the window that pops-up, edit the Value Data to whatever you want your default title to be.
If there is no Window Title, you’ll need to create it. In the Edit menu, select New and String Value. Change the Name to “Window Title” and then set the Value Data.
Close and restart Internet Explorer, and there you go!
Now you can use your newfound power to place subliminal suggestions on your boss’ computer. “Let everyone go home early!” (Say ‘everyone’ instead of using your own name, so your boss won’t know who did it!)
But always remember that with great power comes great responsibility. Have fun!
Yes, it’s true! See, I changed mine to my favorite slogan – “Do good, joy follows.”

Changing the title is a simple process that only requires you to change one ‘key’ in your registry.
The standard disclaimers apply: don’t ever add random keys to your registry or delete keys unless you really, really know what you’re doing.
Let’s get to it!
Run the Registry Editor by opening the Start menu and selecting Run. Type “regedit” and click OK.
Hit F3 to bring up the search menu and type “window title.” That should take you to the following key:
KEY_CURRENT_USER\Software\Microsoft\Internet Explorer\Main
If the search doesn’t find anything, navigate to the above key by clicking in the left-hand side of the Registry Editor.

If the key exists, simply double click on the words Window Title. In the window that pops-up, edit the Value Data to whatever you want your default title to be.
If there is no Window Title, you’ll need to create it. In the Edit menu, select New and String Value. Change the Name to “Window Title” and then set the Value Data.
Close and restart Internet Explorer, and there you go!
Now you can use your newfound power to place subliminal suggestions on your boss’ computer. “Let everyone go home early!” (Say ‘everyone’ instead of using your own name, so your boss won’t know who did it!)
But always remember that with great power comes great responsibility. Have fun!
E-mail Address Trick
I stumbled upon this one the other day and just had to share it with you.
Someone had requested to be added to the newsletter, so I copied their e-mail address and had full intentions of pasting it into the subscription form.
Well, I must have been distracted at the time because I accidentally pasted the address into my web browser address box and hit Enter.
Before I could mutter a profanity, up came the web site for his e-mail domain!
Here, try it with my address:
steve@worldstart.com
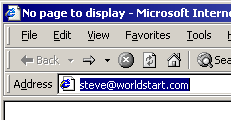
Don't click the address, copy and paste it into your web browser then hit Enter.It will turn into this:
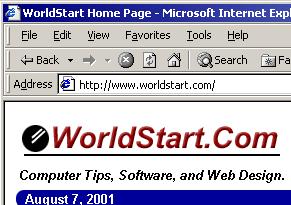
Cool huh?
So, if you ever feel the need to find out where someone is coming from, especially if it's a "SPAM" type e-mail, just copy and paste the e-mail address into your web browser and hit enter.
This is also good if you want to see someone's web site but only have their e-mail address (presuming that they own their own domain).
Finally, this little trick doesn't always work. So, no tears if you try it with a different address and it flops, OK?
Internet Information Safety
Giving out your personal information to sites on the net is a touchy subject. My suggestion would be to only give out info to sites that you trust. If you don't trust a particular site, don't give out your info. I'm not too worried about giving out my info to most business sites, but I'm not going to give it to someone who just would like to have it in order to see where their visitors are coming from.
Note that most good, reputable sites will have some sort of privacy policy that tells you exactly how the information you give them will be used. If you're at all unsure, it may be worth reading the privacy policy for the site in question. If you can't find one, any paranoia you have regarding that site is probably justified.
Most sites that ask for your personal information are doing so because you're signing up for something or making some type of purchase. After all, how can you buy something online if you won't give out your address and credit card info? When this is the case, I carefully look through the site to make sure it looks OK (I check for stuff like contact info, addresses, etc.) before I give out my any of my information.
If a site is asking for a credit card number, they will only get it if I'm actually making a purchase. If it's for any other reason, forget it. If they are trying to get my social security number, they don't have a chance unless I see good reason for them to have it (applying for a loan, joining an affiliate program, etc.)
Oh, one more thing since we mentioned credit cards. I get a lot of people who are worried about sending their credit card info to a company via the internet. As long as the site is secure (you should see a little "lock" in the Status Bar of your browser - lower left hand corner), you should be safe.
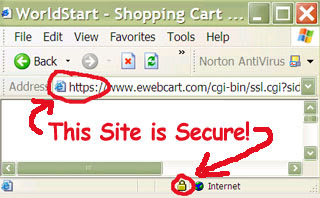
Of course, you have to trust the company you're dealing with. If you give your card to a site that's shady (porn, illegal items, etc), then you shouldn't be too surprised if you run into problems.
On the other hand, if you're dealing with a good, legit site, then you shouldn't have any problems. However, remember, not all companies are the same - before you give any site your credit card info, be sure they have stuff like contact information, a privacy policy, and you may want to check their return policy, too (assuming it applies). Doesn't hurt to do a little homework.
For the most part, it seems like credit card theft on the internet is more likely the result of having a dishonest employee (and that's not just an internet problem), than the transmission getting intercepted. It just kills me when I see people who won't use their card online, but they don't hesitate to pass it to any scummy looking store clerk, never giving it a second thought. In my opinion, you're usually as safe, if not more so, online.
I guess the best advice is to be careful. If you don't have a good reason to give out your info, then don't. If you don't feel comfortable with a site or don't completely understand why they need your info, then don't give it out.
A good resource for more information is the Identity Theft Protector software.
Search Engine
Having a hard time finding something online? Does it seem like you type in your search term but don't get anywhere near what you're looking for?
Well, here's a couple tricks that seem (almost) universal between search engines.
Let's say you're looking for sports cars and all you're getting is information on baseball and football (sports). What can you do? Try some of the following:
1. Try:
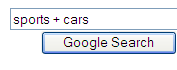
sports +cars
Most search engines will interpret this as meaning you only want results that have both the word "sports" and "cars" in them. Some search engines let you us the word "and" to do this as well (i.e. sports and cars).
2. You can also try to exclude terms. Let's say you still aren't getting what you want with sports cars (you still keep getting baseball info). Try something like:
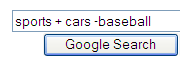
sports +cars -baseball
The "-" sign tells most search engines to exclude results that have whatever word it is that has the "-" in front of it. (Don't put a space between the - and the word to be excluded though!)
3. If the above seems too confusing, most search engines have an "advanced search" option that gives you a web-style way to help you accomplish the same thing. Instead of using "+ / -" they use drop down boxes and option buttons. It is usually easier to search this way, although it's probably faster to use steps 1 & 2.
4. The next thing you might try is being more specific. Instead of just sports cars, maybe use exotic sports cars. Try different combinations of search terms until you get what you're after. (Careful with that word "exotic" though!)
5. Also, you may want to try using quotes. If you type in:
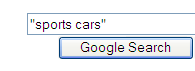
"sports cars"
You should only get results that match that exact phrase in that exact order. Sometimes that can narrow things down considerably.
6. If all else fails, try a different search engine. We have a selection of what we feel are the best search engines on our homepage:
http://www.worldstart.com
Of course the hands-down favorite is Google
There are thousands of search engines out there and not all of them support the tips I have shown you today. If you're having trouble, look for a link for search tips, search help, advanced search, or how to search. Most search engines have lots of information on how to use them successfully
Columns/Rows Tips
Totaling a column in Excel.
You can easily total the sum of an entire column or multiple columns at once. To do this:
* Select the column(s) you wish to total (drag the mouse over the columns you want to select).
* Now, click the AutoSum button (the E symbol).
Quickly sorting columns in Excel
You can quickly and easily sort columns in Excel. To do this:
* Select the column or columns.
* Click the Sort Ascending (A to Z) or Sort Descending (Z to A) button.
Resizing Excel columns or rows.
You can quickly and easily resize columns and rows in Excel. All you have to is point your mouse over the right side of a column or the bottom of a row and drag it over until you are happy with its size.
Spicing up column headings.
If your column headings seem boring, try rotating them to spice up the appearance a little. To do this:
* Select the cells with the labels you want to rotate.
* From the Format menu, click Cells.
* Click the Alignment tab.
* In the Orientation section, either type in or click a desired angle.
* Click OK.
Automatically totaling the data of an Excel column.
You can have Microsoft Excel automatically total a column of data. Let’s say you want the total of cells B1 through B8, and you want the total to appear in B10. To do this:
* Click in cell B10.
* Type in =Sum(B1:B8).
* Now, click anywhere else on the screen and the sum will appear.
Automatically moving to the next column when pressing Enter.
There is an easy way to let Excel know when you are done entering data in a column so that when you get to the last cell in that column, pressing Enter will automatically bring you to the top of the next column. To do this, simply select a range of cells in which you will be entering data. Start typing your data, and when you are done with that cell, press Enter. When you get to the end of the selection, pressing Enter will automatically bring you to the top of the next column.
Sorting columns horizontally.
To sort columns vertically in Microsoft Excel 97:
* Click on any cell from the range that you want to sort.
* From the Data menu, click Sort.
* Click Option from the Sort dialog box.
* Under Orientation, select "Sort left to right."
* Click OK.
Now, simply make any changes you want in the Sort dialog box and your columns will now be sorted horizontally.
Hiding individual columns and rows.
You may want to hide only a certain column or row in Microsoft Excel 97. To do this:
To hide a row:
Place the cursor at the bottom edge of the row header and drag it upwards until the row disappears.
To hide a column:
Place the cursor at the right edge of the column header and drag it leftwards until the column disappears.
Locating the last entry in a row or column.
If you are working in a large worksheet, you may find it difficult to locate the last entry in a row or column. However, there is a solution for this.
To locate the last entry in a row:
* Press Ctrl + Right arrow until you arrive in row IV.
* Press Ctrl + Left arrow.
To locate the last entry in a column:
* Press Ctrl + Down arrow until you arrive in column 65536.
* Press Ctrl + Up arrow.
Numbering rows and columns.
With Excel 97, you can number your rows and columns. To do this:
* Open the Tools menu.
* Click Options.
* Click the General tab.
* Beneath Settings, put a check in the "R1C1" checkbox.
* Click OK.
Your cells will now be numbered using R1C1 style. For example, if you had a cell labeled R7C4, that cell would appear in Row 7, Column 4.
Printing column titles on every page.
To print columns titles on every page of an Excel workbook:
* Open the File menu.
* Click Page Setup.
* Click the Sheet tab.
* Click the button next to where it says "Rows to Repeat at Top."
* Press Enter.
* Click Print.
Chart Tips
Grouping text boxes with Excel charts.
You might notice that when adding a label to a Microsoft Excel chart with text boxes, the text box will not move along with the chart. To fix this problem:
* Open the Drawings toolbar by opening the Tools menu, selecting Toolbars and clicking on Drawing.
* You now need to click the text box, hold down the Shift key, and click on the chart.
* Now you must click the Group button from the Drawings toolbar.
* This will group the text box and the chart together.
Adding Pictures to bars in Excel Charts.
While working in Microsoft Excel, you may want to add pictures to the bars of a chart. To do this:
* Create a chart.
* Click your mouse away from the chart and click the Insert menu, select Object
* Click Microsoft ClipArt.
* Make your selection and double-click on the ClipArt you want to place it in Excel, or click OK.
* Once back in Excel, select the picture and from the Edit menu click Cut (Ctrl+X).
* To get your picture to appear in the bar, just double-click on one of the bars and select Paste from the Edit menu (Ctrl+V).
Quickly creating a chart in Microsoft Excel 97.
You can quickly create a chart in Microsoft Excel 97 by only a single keystroke. Once you have the data for your chart ready, select the data, and simply press F11.
Adding texture to Excel objects like pie slices and chart bars.
With Excel 97, it’s possible to add texture to objects, such as pie slices and chart bars. To do this:
* Right-click on the object.
* Click Format Data Series.
* Click the Patterns tab.
* Click the Fill Effects button.
* Click the Texture tab.
* Make a selection and click OK.
* Click OK again to save your settings.
Changing the colors of your Excel charts.
To change the colors of your Excel charts:
* Double-click on the chart.
* Double-click on one of its bars.
* Select a new color from the menu.
* Click OK.
Adding text to an existing chart in Microsoft Excel.
You can add text to an existing chart in Microsoft Excel. To do this:
* Open the View menu, select Toolbars and click on Drawing.
* Click the Text Box tool (The button with little document with an 'A' on it) and use your mouse to draw your text box.
* Now, just type in the text that you want.
Moving a chart's legend to a different location
When you create a chart in Excel 97, the legend always appers in the same place. To move the legend to a different location:
* Right-click on the legend.
* Click Format Legend.
* Click the Placement tab.
* From here you can choose the new location, either Right, Left, Bottom, Corner, or Top.
* Click OK.
Subscribe to:
Posts (Atom)